Contents


Photo: Morning On Mount Rainier

Orton Diffusion

Photo: Enchanted at Proxy Falls

Dedicated Luminosity and Color Layers in Photoshop

Photo: The Long Bridge

Pondering a Tavern Tale

Photo: Portland Nightscape

Self Correcting Systems

Photo: Looking Up

Good Ideas vs the Status Quo

Photo: Beachcombing

Inspiration + Capability

Photo: Waterfall Flowers

Thoughts on Workshops

Photo: Desert Dreams

Midtone Contrast

Photo Series: Sea Foam Swirls

In Defense of Dandelions


Wednesday, May 29, 2013

Photo: Morning On Mount Rainier

Rosy morning sunlight dances over beautiful Mount Rainier with Edith Creek and purple lupine wildflowers in the foreground.

Morning on Mount Rainier
Copyright Laura A Knauth, All rights reserved.
Please contact me for any usage or licensing options.

I played around with some Orton Diffusion to evoke a more peaceful morning effect.

Location
Mount Rainier National Park, Washington

Technical Info
Canon 50d
18-200mm Lens, 20mm
f/11, 0.6s, ISO 100

Filters
Circular Polarizer
3stop Reverse ND Grad (probably ... forgot to take filter notes)

I'm a huge fan of digital RAW mode after this. The golden morning light surprised me, and I was so rushed to whip out the right filters and setup the shot that I ended up accidentally taking this with -2 EB from a previous experiment. Doh! The glancing light on the peak was done by the time I noticed what happened, but I was able to salvage the photo by adding back the +2EB in DPP. Whew!

Blog Post by Laura A Knauth

Orton Diffusion

My second favorite photography post-processing technique (following Midtone Contrast using Unsharp Mask) is Orton-style diffusion. I have been using this for the past couple years to varying degrees in just about every image starting with Morning at Mount Rainier. The Orton effect adds an almost mystical, dreamy element to the atmosphere which you can dial up or down depending on your preference.

When I first learned about the general idea of the Orton technique, I was using it globally on whole image, but I've come to apply it now by default only to a small degree just the shadow areas (since shadows in real life appear to the eye just a bit more blurry than bright areas). The camera usually just makes shadow areas more noisy which can degrade the overall impression of the image, even if it's not immediately noticeable. So even if I'm not looking for a noticeable Orton effect, whether it's just for gently blurring the shadows or taking the edge off sharpening artifacts, I love Orton diffusion!

The Orton Technique
Orton diffusion effect is achieved when sharp and blurry images are superimposed. This was originally done in the camera using multiple exposures, but I like the control of leveraging Photoshop to dial in this effect in post-processing. There are many ways to do anything in Photoshop, but here's my usual method for the Orton diffusion effect. (I made a macro of these steps to speed up my workflow.)
** The hotkeys listed are for the PC; for Mac, you would use the Option key instead of Ctrl
Orton Diffusion Example Layers
  • Duplicate the Image on a new layer
    • For instance: Click New Layer Icon; then Ctrl+Alt+Shift+E
    • I labeled this layer 'Orton Base'
  • Optional: Open Levels and set the midpoint slider to around 1.6
    • This brightens the image to compensate for global darkening that comes in the next steps. (Although, you could play around with omitting this step.)
  • Duplicate this lightened Image on a new layer (Ctrl+Alt+Shift+E)
  • Filter => Blur => Guassian blur
    • I use anywhere from Radius: 3 - 10 if I want an obvious Orton effect
    • I use around Radius 1 - 2 for a final shadow-only application
    • Sometimes I also play around with more extreme Radius settings for funsies :)
  • Change the Layer mode from Normal to Multiply
    • I label this layer Orton Blur
  • Merge this Orton effect on a new layer (Ctrl+Alt+Shift+E)
    • I label this layer Orton Final; (Or you could leave out this step if you want to do further modifications)
  • Optional: Duplicate the 'Orton Base' layer and move it to the top of the stack
    • Dial back the Opacity % as desired. (I start with 30%)
    • This blends back even more of the original sharpness.
    • You could also selectively restore more of the original sharpness using a layer mask
  • Optional: Create a final layer composite (Ctrl+Alt+Shift+E)
    • I labeled this layer 'Orton Composite'

To restrict Orton diffusion effect to the shadow areas only, I add these extra steps:
  • Copy the pre-Orton image
    • Alt+Click the eye next to the pre-Orton layer (The Background layer in my example)
    • Click this layer to select it
    • Ctrl+A
    • Ctrl+C
  • Add a Layer mask to the Orton Composite layer
    • Select the Composite layer and then click the icon with the dark rectangle and little white circle (next to the fx icon)
  • Alt+Click the Layer mask thumbnail
    • This allows you to edit the pixels in the mask
    • By default the screen will turn white since the mask is currently empty
  • Paste your image into the mask (Ctrl+V)
  • Invert the pixels in the Mask (Ctrl+I)
  • Click the Composite Orton layer thumbnail to view the Final result
    • (This assumes all of the intermediate Orton-related layers are still de-selected.
    • I took a screen capture of my layers panel after all of these steps to show as an example

I use all of these steps to create an Orton-style diffusion so often, all of those steps now seem totally straightforward. As with anything, it gets easier with practice (especially if you are liking the results). At a minimum, you can also try just blurring a duplicate layer, setting the layer mode to Multiply, and then tinkering with the Opacity % for a simple, basic Orton effect. However, I find the complete steps listed above preserve the overall light/dark impression of the image which I usually find valuable. I recorded a macro once I got familiar with the proceedure and particular settings I liked (which really helps to speed up the future process).

In Summary
Figuring out how to give your image an impression of sharpness without looking overdone (especially for the web) is challenging. Using an Orton diffusion effect in the shadows for the final sharpened image has been giving me just the right backoff I've been looking for. It can also be helpful for giving images a dreamy, painterly atmosphere that I find absolutely beautiful.

http://en.wikipedia.org/wiki/Orton_(photography)

Hope you find these tips helpful!

Blog Post by Laura A Knauth 

Tuesday, May 28, 2013

Photo: Enchanted at Proxy Falls

Incorporating unexpected elements of the landscape can add unexpected delights!

Enchanted at Proxy Falls

Copyright Laura A Knauth, All rights reserved.
Please contact me for any usage or licensing options.

Proxy Falls has so many different cascades; the volume of sound from this place was amazing! I remember being drenched standing anywhere near the main blast, but off on the sides the spray wasn't quite so aggressive.This particular location was particularly enchanting since you could be fairly close and still look up at the water as it was pouring over the rocks and mingling with the sun.

I thought the unexpected droplets on the lens helped convey the moment. Kisses from Proxy Falls :)

Technical Info
Canon 50d
18-200mm Lens, 18mm
f/16, 6sec, ISO 100
Circular Polarizer

Blog Post by Laura A Knauth

Monday, May 27, 2013

Dedicated Luminosity and Color Layers in Photoshop

I've found that using dedicated luminosity or color layers in Photoshop has been a very helpful technique. It provides more control for your intention by eliminating unintentional artifacts.

Here's the essential idea:
  • Use Luminosity mode when adjusting light/dark tones (or for sharpening)
  • Use Color mode for color-specific edits

Actually LAB mode has native capabilities that essentially do the same thing (since L is a separate lightness channel, and 'a', and 'b' are the color channels). I've been using the RGB mode primarily though (so far), and for this color mode (RGB: red, green, blue), both the lightness and color information is mixed together, so adjustments intended only to effect light or dark values, might tweak the colors as well. These artifacts might be subtle, but over several adjustment layers, I found myself noticing the impression of my image to be increasingly 'off' from what I was expecting. Being very specific about whether the adjustment layer is intended for the light/dark (luminosity) or color and setting the Photoshop layer modes accordingly has helped me to create adjustments that function as I originally intended.

Luminosity Mode
If your processing technique is only intended to effect the light or dark values, then try changing the layer mode from 'Normal' to 'Luminosity' in order to prevent side effects of your adjustment from unexpectedly effecting color tones. Adjustment layers where you might find this useful are:
  • Curves or levels adjustments to brighten or darken the midtones, or overall dynamic range
  • Sharpening techniques (since it is usually achieved by increasing contrast around edges)

Combining Modes
Sometimes, I like when the 'Multiply' layer mode adds some color saturation as it darkens, but sometimes I don't (which is when I would use this Luminosity clipping technique). If you want to use photoshop layer modes like Multiply (darkening) or Screen (lightening), you can also 'mask' these effects with the luminosity mode by adding a new 'dummy' adjustment layer (I usually use levels) and "clip" the light-related adjustment adjustment layers to it. (alt/option+click the line separating layers to clip the top layer to the bottom) Then set the dummy layer mode to 'luminosity', and any layer clipped to it (you can stack them) will be restricted to luminosity-related changes only.

Color
Likewise, if your processing adjustment layer is only intended to effect the color, I would try changing the adjustment layer mode from 'Normal' to 'Color' which would prevent unexpected light/dark tone artifacts. I find this most useful for:
  • Local Color adjustments (fixing lens flare artifacts, toning down a distracting element, ...)
  • Vibrance/Saturation adjustments

So, that's the basic idea. I've been finding it very helpful in all my recent processing, and hope you find it useful too!

Blog Post By Laura A Knauth

Photo: The Long Bridge

The Astoria Bridge towers over the remnants of an old dock one foggy morning.

The Long Bridge
Copyright Laura A Knauth, All rights reserved.
Please contact me for any usage or licensing options.
Technical Details
Canon 50d
Canon 18-200mm Lens, 18mm
f/11, 1sec, ISO 100

This was one of the first images where I started paying close attention to dedicated luminosity and color layers when post-processing in Photoshop. I find this technique very useful for reducing unexpected artifacts and allowed for more control. More details are available in the article.

Thanks for stopping by!

Blog Post by Laura A Knauth

Sunday, May 26, 2013

Pondering a Tavern Tale

I read this old parable a long time ago and have always kept it in mind. I couldn't find the original source material, or the original author, so to paraphrase:

A man walked into a tavern, and found a group of patrons arguing about how many teeth are in a horse's mouth. He suggested they all take a look at the horse in the stable outside to find out …
at which point they promptly beat him and tossed him outside.

Why bother measuring what can be measured when you could just have a contest about who has a bigger ego? Sigh. Take a look at most news 'shows' today and you will likely see glaring evidence of the same bad behavior as the author of this parable was warning about hundreds of years ago. Life is complicated enough without distractions from the cult of personality.

Critiquing the Skeptic
While you might expect salesman types (or news personalities) to be most susceptible to personality-driven, ego-based arguments instead of fact-driven focus, I'd caution for the same vigilance even for the most esteemed in the academic community as well. Most modern academic inquiries seem to be based on skepticism - that is, putting proposed ideas to a rigorous test, then either: finding any crack or failure which would invalidate the idea, or else having found no failure, giving the idea an official stamp of approval. A valiant attempt. But unfortunately, I think this approach ends up discarding too many good ideas, too many true facts, along the way.

If a champion of an idea makes a mistake in their presentation, the ultimate idea may still be right even if the implementation by that particular champion is flawed. How many times have you seen a news clip, video, or read a quote from a random person in the news who's main idea you agreed with, but cringed at their bad choice of words. It's a case where you know the underlying idea is better then how it sounds. All too often you see the result: bad presentations create easy 'straw men' that are easily dismissed or ridiculed. The lesser argument can appear to 'win.' In this way, skepticism can lead to these same personality-based arguments overshadowing truth-based inquiries. The danger is when such criticism deters others from ever looking at that badly framed idea again. It creates a blind side where potentially real truths are left unknown, unmeasured.

Skepticism takes a disastrous turn when questions are intended to destroy rather than to understand. It becomes a vehicle for another top-down, authoritarian system so pervasive in our modern society: Only validated experts are qualified to examine data. It's as if they presume to valiantly eliminate thought viruses from infecting a supposedly childlike population. Destroying ideas that challenge the system becomes like a feather in their cap, and it's 'for your safety'. (Same goes from my experience in the corporate world, where people are also rewarded for killing new proposals 'to meet schedule' just as you might expect they should be rewarded for creating new ones.)

Look for Shreds of Truth, not Cracks of Failure
But what if everyone took on that responsibility for themselves? While it is definitely valuable to understand the best currently accepted theory from the experts, I would caution very strongly from stopping an inquiry there. Now if this latest default position happens to meet your needs, then you're done. But if you are still dissatisfied with limited options, I don't think it's reasonable to despair, thinking the official line is the only reasonable course of action. I think it's reasonable to hear other possible options, regardless of the source. I love this approach; it can be so invigorating and inspiring. The key is to look for shreds of truth, not seek cracks of failure. With this approach, you are not an unsuspecting childlike consumer that must be fed only sanitized options, you are autonomous investigator, looking for glimmers of hope in a motley universe.

For example: rather than reading only approved textbooks or talking only to an approved authorities, you could read fringe books, listen to podcasts, or watch YouTube videos just to find one useful phrase or idea (although hopefully you can prioritize so the odds are better). And you will definitely have to activate your best pattern matching mind filter (serious discrimination skills needed) because there will likely be a lot of misguided tangents to sift through. But for all that, you may find that just one phrase becomes like a key, unlocking a whole new viable approach. That one idea could be life changing, opening up huge opportunities or cost savings. The very approach you stumble upon from random fellow human beings might become lauded by experts in the next 50 years, but has just not been officially recognized yet. It's a common blindside in our society. How often do you hear: "No one could have seen it coming."   … Really? How about taking a look at the people who were thrown out of the tavern, so to speak.

Remedy
Going back to the parable, if too many useful facts are being ignored due to the tendencies ingrained in modern society, I think one good option is to figure out how to make the best use of that true information. Could be a business opportunity, or just something simple you can incorporate to benefit your own life. Anyway, good ideas are usually just a fraction of the total energy compared to what it takes to convince someone else the idea is right. Why bother with that anyway? Such arguments really do seem mainly ego driven.

It could be because I'm coming from an engineering background, but I say the best remedy for unrecognized (or ignored) facts is to find out a useful application of those facts and then test it out yourself. If the idea really was bad or the fact turns out to be useless, then at least you didn't expend your time and reputation defending it. If the idea is truly good and useful, then you will benefit (since knowing something that is true, but no one else believes is technically a business advantage). And when you succeed, people will probably notice and then ask you what you're doing. Problem solved; no yelling. Seems like a decent plan to me. :)

Blog post by Laura A Knauth

Thursday, May 23, 2013

Photo: Portland Nightscape

Love that blue hour just after sunset. The longer exposure times combined with that lighting really help to reveal some incredible sky color that is not immediately apparent to the eye in real life. It's one of the rare times where differences in the camera's vision compared to your own can work wonderfully in your favor. Combine the quality of this lighting with some water reflections, and it's hard to go wrong. :) 

Portland Nightscape
Copyright Laura A Knauth, All rights reserved.
Please contact me for any usage or licensing options.

At the time I took this photo, I didn't know about the six stop ND filter (which I now use for most water-related shots), but the naturally low lighting just after sunset naturally allowed for a surface blur across the water and helped reveal long colorful reflections. (I hadn't expected the blurred boats near the dock (they were barely moving to my eyes), but love that it adds a subtle impression of movement in the scene.

Location
Downtown Portland, Oregon
Hawthorne Bridge reflection in the Willamette River

Technical Info
18-200mm Lens, 24mm
f/5.6, 83s, ISO 100
Circular Polarizer + 3 Stop ND Grad

This was actualy one of my first shots with my Canon 50d camera, and seeing it reminded me of a particular quirk I had to learn about the camera at the time in order to get this shot. In order to leave the shutter open beyond 30 seconds (the limit of my camera in Aperture or Shutter priority modes), I set the camera shutter time to 'bulb' and use a cable release to manually hold the shutter open. I had to play around with the exposure to find an aperture/time combination that worked well. But on Canon cameras, just switching the camera 'on' isn't sufficient to enable the 'bulb' shutter setting. There's an additional tick on the power dial which is a required setting before the camera can be set to bulb shutter mode.

Hope this helps!


Blog Post by Laura A Knauth

Wednesday, May 22, 2013

Self Correcting Systems

There are many paths, 
    but some are more efficient than others.

I see huge benefits to setting up or supporting self correcting systems vs micromanaging self destructive systems. That may sound obvious, but I think many inefficiencies in modern life stem from continually supporting essentially destructive systems without realizing that a better option might be available; that is, investments that change the nature of the system so that it automatically corrects itself in the future. As a first step, here's a simplified picture of these two types of systems:

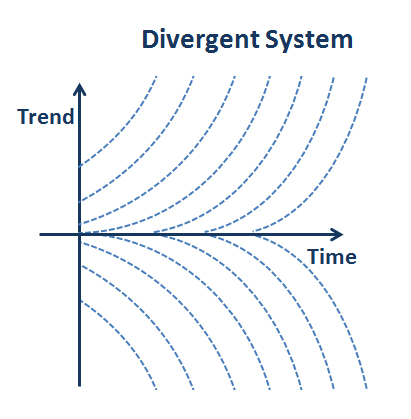
I am attempting to show the trend of two systems over time. In my example, the ideal functioning of the system is in the center, along the Time (or horizontal) axis. In the day to day functioning of the system, noise or external events can bump a data point away from ideal. As time continues to increase, the datapoint, the result of the system, would follow one of the trendlines shown. Once the ideal functioning of a divergent system is perturbed, the trend of that system will follow the trend lines of the divergent chart, leading ever away from ideal. If a point on the convergent system is perturbed from it's ideal, over time, the convergent system will trend back toward ideal, re-establishing the balance point with minimal external effort required.

There is a useful 'path to victory' in both systems (along the Time axis), but divergent systems are high maintenance, while convergent systems are self-correcting. Divergent systems require authoritarian oversight and constant micromanaging to make sure they continue to function properly; and there is a constant danger of over-correction. 'Fishtaling' is a constant threat when correcting divergent systems since what was supposed to be a correction can instead cause the system to spiral out of control in the opposite direction. Only tiny deviations can set off a chain reaction that can cause a response that moves far away from ideal. But once you setup a convergent system, further maintenance is minimal. The convergent system 'fights' external inputs that seek to push it off course. Sounds like a good idea to me!

For some real world examples: you could think of driving your car in reverse as a divergent system. It can be done in a pinch, but extreme care must be taken with every course correction to ensure the car does not veer wildly out of control. A much more stable system is driving your car forward. Once you set your course, physics supports holding the car in that line.

You could say fission (used by modern day nuclear reactors) is a divergent system, but fusion (a process of the Sun) is a convergent system. Constant energy must be expended to prevent fission reactions from running amok and causing destruction in a cascade runaway. With fusion, energy must be expended to maintain the reaction; if the energy input stops, the reaction ceases. Automatic fail safe.

When I go on walks or am doing chores, I think it's a useful thought exercise to wonder about the various factors or issues effecting my day to day life and try to see whether they fit into more of a self-correcting (convergent) system, or whether they are more destructive (divergent) systems.

Health
Last year, I realized the very functioning of our bodies might be tied to this concept. I began to consider whether we are born with convergent, self correcting bodies, analogous to a convergent system. It's common to see references of children's remarkable ability to heal quickly, and equal jabs about the opposite effect as we age. Is that really natural? What if over time, our bodies become compromised as a result of mistaken advice or otherwise improper maintenance and in essence, move gradually from a Self Correcting system to a Self Destructive system?

For an added perspective: Imagine the area inside the system graphs above represent minimum structural integrity - aka: staying alive. If you run off the graph, game over. Now it's true a large enough external trauma could bump you outside the limits of either graph. But if a trauma is survivable, or during the day to day jostling of regular living, I'd say the odds are significantly improved for long term optimal functioning in the self correcting system. (Depending on the severity of a particular trauma or recovery timeline, some intervention might still be recommended even with a self-correcting system, but it's likely to be far less intensive and far less risky.)

It suspect most modern medical approaches follow a divergent, self destructive view the body. It suggests that our bodies are prone to failure and requires constant, expensive, interventions to maintain health. This intervention often leads to side-effects, which are accepted as normal collateral damage. (Now in cases of acute trauma, I am all for emergency intervention, but most health costs and most dire statistics are from the chronic conditions.) What if our time and energy, our effort and our dollars are instead be spent not not on constant interventions, but on re-establishing our natural self correcting mechanisms? Modern medicine does not often emphasize this as an option, but since reducing medical costs and increasing longevity are some of the most sought after solutions in our modern life, I think this approach worth a test. My Health blog posts cover more specifics about my latest health strategies.

Finances
It's also useful to consider how the different divergent and convergent systems fit into financial strategies. Instead of accumulating increasing monthly debt bills and then trying to win the lottery (divergent system), a better strategy might be to setup a more convergent system such as: to reduce or eliminate fixed expenses and set up systems of income (passive income, for instance). I would certainly love a windfall anytime, but for planning purposes, striving to setup systems of income seems a far more stable and long term lucrative approach than hunting for single treasures.

Summing It Up
There are many surprising and 'hidden in plain sight' examples of divergent systems through varied aspects of modern life. Just wanted to share some ideas to hopefully inspire creativity towards more efficient long-term solutions. I'd say trying to hold the ideal line in a divergent, or self destructive system should be a final resort in an emergency, or as temporary stop gap. But on a day to day basis, instead of spending energy chasing after 'fires' and worrying about micromanaging the individual effects of random noise or unexpected external events, whenever possible, I find much larger financial, energy, and time wins by recognizing opportunities to support or create self sustaining systems. 

Cheers!

Blog Post by Laura A Knauth

Tuesday, May 21, 2013

Photo: Looking Up

Here's a nature photo taken in an unlikely place  a parking lot  with an unlikely camera  a point & shoot. It's all about perspectives. ;) One of the mantras in many photo books recommends: when the sky isn't particularly compelling (perhaps on solid gray days), then compose shots without the sky. ...So extending that theme: if you are in the middle of a parking lot, try leaving out out the concrete. ;p

Looking Up
Copyright Laura A Knauth, All rights reserved.
Please contact me for any usage or licensing options.

These are springtime flowers on a sunny day from one of my favorite perspectives: the wide angle close up. Contrary to most flower shots, I didn't zoom in, but set the widest angle possible and moved the camera as close to the subject as it could stay in focus.

This was a spontaneous photo moment. I didn't have any fancy gear with me and just was heading back to my car when the lovely flowers in the median caught my eye. I remembered I had a little point & shoot camera with me, and it was nice to find a creative way to reflect on the moment. The camera is essentially touching the ground with the lens pointed back up at the flowers. Needless to say, I had to spam many many shots through trial and error since I couldn't look through the viewfinder, but it was a lot of fun!

Technical Info
Lumix ZS19, 4.3mm  with Macro mode enabled
f8, 1/800, ISO 100
Fill Flash

Fill Flash in Daylight
I wanted to highlight that I overrode the camera settings to force the flash to fire. This is a helpful technique for shooting subjects in the midday sun where the normal camera settings can have a tendency to expose for the background leaving the subject in the dark. The remedy is to force the flash to fire; it acts as fill flash, allowing the subject to shine. :)  It probably looked strange to passersby seeing me use the flash in the daytime, but this shot wouldn't have happened without it!

Thanks for stopping by my blog!

-by Laura A Knauth

Sunday, May 19, 2013

Good Ideas vs the Status Quo

One of the true life lessons I accidentally learned while studying for my engineering degrees was: even ideas that far surpass what's currently out there will not gain traction unless that idea in practice is a more convenient and cost effective compared to what already exists. (Technical example: Even though silicon is not a material conducive to efficiently produce lasers (a big limitation for silicon-based microprocessors), today's computers are still silicon-based because the manufacturing process for working with silicon are so cost effective compared to what might theoretically be the preferred choice: Gallium Arsenide.)

Whenever a new idea comes on the scene, in order for it to be adopted as the new standard, it has to not only be inherently better on paper, but also has to overcome the tremendous inertia of the existing infrastructure. It's good to keep this in mind, because when working on your own new ideas, it can be frustrating to realize that a more efficient solution to common problems might exist, but everyone seems to be ignoring it. Instead of spending energy complaining about why these 'brilliant' ideas are not adopted, it can be useful to figure out the practical reasons why the existing systems prevail. There is a cost to manifesting new ideas in an existing environment. Unless someone's really good at marketing, it seems to me only incrementally good ideas will fall by the wayside, and only ideas that improve the status quo by at least an order of magnitude (ie: a paradigm shift) have a chance to gain traction.

When taking on the responsibility of manifesting new ideas (as an entrepreneur), unexpected, but practical problems, might actually provide crucial insight as to why the current paradigm does exist. That experience can at least provide valuable insight about the true complexity of the problem. Not to say the existing paradigms are the final solution, but at least realizing the true complexities of a problem removes artificial frustrations about why what appears to be the obvious solution is not adopted. Blindsides happen when focus is too limited and you are still buffeted by unseen effects from the full system. At least making the effort to solve the problems you see would (at worse) reveal more factors to take into consideration. You can then rework the problem from this new perspective, or you might decide what you thought was a problem, is actually a decent solution.

So it seems a big win either way to put your energy where your mouth is, so to speak. By investing energy in your own ideas, you either learn more about crucial variables you had overlooked, or you are successful at providing a helpful solution to a tough problem!

-by Laura A Knauth

Friday, May 17, 2013

Photo: Beachcombing

Searching for treasure on the Oregon coast...

Beachcombing
Copyright Laura A Knauth, All rights reserved.
Please contact me for any usage or licensing options.

I have to say I really love this image even though it is simple. Typifies the cloudy days that are still beautiful in the Pacific Northwest. This is haystack rock near Cannon Beach, Oregon.

Technical Info
Canon 50d
Canon EF-S 18-200mm Lens, 60mm
f16, 1/10s, ISO 100

Filters:
2-stop Graduated ND Filter
Circular Polarizer

Adding Final Processing Sparkle
A processing technique I've recently found and will start incorporating in all my future images is to add a final tweak to boost the brightest whites of the photo. Seems to really make the image sparkle. I started re-opening a copy of the image in Camera Raw and bumping up the Highlights slider in the Tone Curve tab slightly to the right (starting with +10 or so). I also check whether bumping down the 'Dark' slider slightly to the left adds an appealing effect. Sometimes that can really add richness to the tones.

I've been watching what these sliders do to the tone curve in Camera Raw and have started mimicking that recently in Photoshop directly using a final Curves adjustment layer. Doing this step too soon in post-processing might take away more detail then you intended, so I've been saving these final adjustments to the end. Just wanted to mention this technique because I've realized that just when I thought my images were essentially finished, I found I liked the image much more after trying these final highlight or dark tone tweaks.

Hope you find this useful!

-by Laura A Knauth

Thursday, May 16, 2013

Inspiration + Capability

Having a good idea is not enough. A good idea needs capability as the driving force to bring that idea to fruition. The famous quote is: "Genius is one percent inspiration, ninety nine percent perspiration." 

Buddha and Augustus to symbolize
Inspiration in Balance with Capability
  • Inspiration is akin to picking out your destination on a map.
  • Capability is operating the vehicle that takes you there.

One without the other leads to troubles. Continuing the analogy:
  • Without inspiration, you might drive around aimlessly in circles or endlessly haul someone else around to fulfill their wishes.
  • Without capability, you stay put and dream of lovely places never to be physically seen.

In other words, imbalances in Inspiration or Capability lead toward negative tendencies that trend either towards: Pathetic or Pointless:
  • Inspiration without Capability => Pathetic   (harmless, but no action)
  • Capability without Inspiration => Pointless  (harmful or useless action)

The Remedy:
  • Inspiration balanced with Capability => Useful Action
In other words ... Dream Big, Live Real  for the win  :)

Staying 'in the zone' of balanced inspiration + capability requires constant vigilance (and especially requires taking responsibility for yourself  ... before something else does). Keep trying to optimize through experimentation, notice the results, and iterate ever onward! As you continue along your path, you might decide shift your intended goal, or upgrade your transportation along the way, so to speak.

At the moment, I tend to be inclined more towards the inspiration side of things and am constantly trying to improve my capabilities to properly express my intentions. I still have a way to go in that regard, especially since I've recently changed my intention to focus on writing and photography full time. (I was a design engineer for years; and would say my long stint in corporate America was trending way in the opposite direction.) It helps me to think about these two dual goals - merging inspiration with capability - to effectively prioritize my time and energy, eliminating distractions, and at least working to solve the right problems. And as an entrepreneur, it's definitely crucial to realize that even producing good work is not enough; advertising will be a huge component. (Yeah, definitely still a work in progress . . .)

As children, we start out with grand inspiration, but lack experience, the capabilities to achieve those visions. I think it is a crucial life challenge to develop capabilities without loosing sight of our own initial inspiration. I think we are susceptible, especially in the modern environment, for our capabilities to be honed in service of someone else's goals, not our own. A very dangerous blind side. After finishing so many years of earnest training, we might become like little assassins - our capabilities serving to manifest the intentions of another. That may sound dramatic, but it's so easy to become sidetracked. It's a straight up difficult process to 'become who you are'. Talk about a moving target!

And after all, learning capabilities is in a sense like programming yourself. Even admiring someone else's work might dim your own memory of what you wanted to achieve, just as it might also open a door to a toolset that allows you to fulfill your own dreams. It's a tricky balance, but I find keeping in mind these two pillars of inspiration + capability, both together, helps inoculate against pitfalls of distraction or hijacked intentions. I think achieving this balance in stride is true maturity and joy. (And in some sense, you could even think of walking as controlled falling.)

In some sense, capability is like the structure that creates the opportunity to manifest your soul's desire.  Finding and honing the right capabilities to support your own inspiration seems to be the name of the game. Hope these thoughts help you too along the way!

-by Laura A Knauth

Tuesday, May 14, 2013

Photo: Waterfall Flowers

Waterfall Flowers
Copyright Laura A Knauth, All rights reserved.
Please contact me for any usage or licensing options.
Proxy Falls is a huge waterfall with a thundering roar, but some of the cascades separate from the main deluge to create the opportunity for a more intimate scene. Fortunately on cloudy days or for waterfalls in the shade, there is time enough to spend hours trying different perspectives using various lenses (compared to the rush to catch what optimal compositions may reveal themselves at the quickly changing light of sunrise and sunset).
 
For this shot, I tried a close-up down near the mossy rocks at the base of one of the quieter cascades to capture some foreground detail that might otherwise be overlooked viewing the spectacular waterfall at a distance. Here are some sweet flowers popping up over the bank.
 
Location
Proxy Falls (near Sisters, Oregon)
 
Technical Info
Canon 50d
18-200mm Lens, 35mm
f/29, 3.2s, ISO 100, EB +1.7

Filter:  Circular Polarizer
 
 
 -by Laura A Knauth

Monday, May 13, 2013

Thoughts on Workshops

I've taken a couple photography workshops in the past, and I have to say that I do not think they are a worthwhile investment. I actually wasn't even seeking them out, but signed up mainly because several of my photo friends also signed up - I suppose I wanted to be social and convinced myself it could be worthwhile. Most photo workshops are at least several hundred dollars, not including transportation or lodging (both of the workshops I went on were over the weekend, so it involved an overnight stay). That all adds up to what turned into a significant investment (for me anyway). I have absolutely nothing against the workshop instructors; they were good people, and I did come away with a few tips that I still use today. But how much $$ is an idea worth . . . and could you have found out elsewhere? It's not easy to decide; here are my thoughts.

The main issue for me is cost/benefit. Every time I meet up with my friends to go out and take pictures, I learn something new, something valuable. I've heard people say on several different occasions that a main benefit of workshops is it commits you to actually go out on a particular day and take pictures . . . well, you can actually do that on your own, for free, just using discipline. As in: take out a pencil, mark your calendar, and then follow through. Yeah, I don't do that enough myself (I'm still actually working through a huge backlog of photos I've taken, but not processed over the years), but if I ever had an urge to take another photo workshop, I would instead direct that energy to the pencil/calendar approach first. ;p

I've already posted every tip I learned from workshops that I thought was valuable in the Photography topic section of this blog. To recap those: the main two learnings from my past photo workshops were:

Interestingly, both of these tips were not formally part of the workshop, just random things I either overheard on the day or were randomly brought up through a question. I unfortunately also learned tips that I knew from prior research were not right, or led me astray and I've subsequently abandoned. It's a problem when the people leading the workshops are good enough to be impressive, but not yet knowledgeable enough themselves to help you avoid basically amateur pitfalls. I had even asked in one of the workshops about any tips to help organize gear while you are shooting at critical times of the day (since I always seem to be rushing to find a particular filter, or adapter, or lens, and end up missing opportunities); I was told that was something I should work out for myself . . . and I am taking this workshop, why?
Travel By Twilight
Copyright Laura A Knauth, All rights reserved.

Workshops have the mystique that you will learn something incredible that could change your trajectory and transform your craft, but frankly, I've learned incredible things just by chatting with fellow photographers while out on location, reading photo books from the library, or watching YouTube videos and podcasts. At the end of the day, I would have preferred to invest the money I spent at workshops in a new camera lens or gear (heck, even just more batteries or memory cards which I feel guilty about buying but are incredibly useful in a pinch), or transportation & lodging on impromptu photo trips with friends. Some of my favorite photos I've taken far were from one such trip with friends to Death Valley National Park (ie: Fire & Ice, Heavenly Dunes, and Travel by Twilight, among others).

So, in the end, I'd have to say workshops seem like a pyramid scheme to me. At this point, I'm skeptical of taking advice from photographers that make most of their money through other photographers (via workshops), and not from people who are actually buying photographs (which seems to me the ultimate goal). Again, nothing against workshop instructors; it's just that you can probably learn something similar for free by going on photoshoots with fellow photographer friends and mainly experimenting yourself. 

One of the benefits of workshops is the chance to meet a whole new set of photographers. Networking. Seems like producing good images is only the first step, but networking - or who you know - is a huge second component to becoming a successful photographer. (I suppose that's true for most anything, actually.) The issue is whether spending hard earned money on workshops is the most cost effective means to achieve this. There are other ways to meet up with fellow photographers that are not fee-based, after all. 

It's an individual decision, and it's true that you never know where you will find some gem of an idea that will lead you to the fastest improvement. At this point though, I'm inclined to avoid workshops, and focus instead on individual practice (reading books and consistently experimenting with the various techniques) and more photoshoots with friends.

Hope these thoughts are useful :)

-by Laura A Knauth

Sunday, May 12, 2013

Photo: Desert Dreams

This is one of the four larger peaks of the Mesquite Flat Sand Dunes. The larger dunes are tricky because they are a magnet for hikers and usually are covered with footprints. This dune was the one further away from the parking lot and had a nice ridge for catching sunset rays.

Desert Dreams
Copyright Laura A Knauth, All rights reserved.
Please contact me for any usage or licensing options.

I found the dunes to be a very challenging location - seemed to me an exercise in extreme opportunistic photography. The truly beautiful lighting around sunrise and sunset doesn't last very long; by the time you see how the sunlight will play off of the terrain, you inevitably realize your intended comps have footprints in the way, and it is difficult to move quickly from dune to dune to try again. (Quite a workout!) In the end, I found the most success staying planted in a reasonably promising location and making the most of it, even if my initial comp didn't work. I didn't expect so many fluffy clouds for a desert scene, but there they are. ;p

Location
Mesquite Flat Sand Dunes
Death Valley National Park, California

Technical Details
Canon 50d
Canon 18-200mm Lens, 20m
f/13, 1/80s, ISO 100

Filter
I'm pretty sure I used just a Circular Polarizer for this one.

Thanks for stopping by my blog!

by Laura A Knauth

Saturday, May 11, 2013

Midtone Contrast

This is my favorite Photoshop processing technique at the moment: boosting Midtone Contrast using the Unsharp Mask filter. Increasing Midtone contrast removes what looks like a hazy film over your image and I think makes images look much more vibrant.

I haven't posted too much about my processing workflow yet since I’m still significantly tinkering with it. Regardless of what I'm trying though, I add this step somewhere along the way. I've been using this technique for several years, and have yet to find another method I like better. The good news is that Unsharp Mask should be compatible with most any version, even ancient versions, of Photoshop.

Unsharp Mask Midtone Contrast Technique
Since the technique uses an Unsharp Mask filter, I first create a new merged layer (ctrl+alt+shift+e on a PC) to preserve the original background image.

Then select Filter => Unsharp Mask  (optionally, make the layer a smart object first)

The settings for Unsharp Mask have nothing to do with sharpening. Instead, you will do something strange, very strange. The basic template is to essentially make the Radius much bigger than the Amount (and leave the Threshold very low; I like 0).

Unsharp Mask Settings:
  • Radius to the max : 250
  • Threshold to the min: 0 
  • Then vary the Amount to taste.

I start with Amount: 5, but have been known to push it up past 40 depending on the image (for big moves above 10, I sometimes prefer to repeat the process on subsequent Filter layers for a smoother effect, but did it all in one for this example).

Midtone Contrast Example
Left: Original
Right: After Midtone Contrast enhancement 
Unsharp Mask settings shown (Amount:40; Radius 250; Treshold: 0)

Quiet Morning Waves,  Copyright Laura A Knauth

This midtone contrast technique has helped me so much; I don't notice any weird haloes compared to other approaches. I had thought this Unsharp Mask technique was just a poor-man's version of the Clarity slider, but when I finally upgraded to Photoshop CS5, I was so dissapointed at the haloes introduced by the vaunted Clarity slider in Adobe Camera Raw. Turns out, I like the old Unsharp Mask approach for boosting midtone contrast much better!

Caveat: The one big drawback for this approach in my workflow is that this technique uses a filter, not an adjustment layer. Even using 'Smart Objects' in later versions of Photoshop does not really help because it doesn't change the fact that any further tweaks you may make to adjustment layers below this image will no longer propagate to future adjustment layers. For this reason, I try to use this technique at the very start of my flow and then build any adjustment layers on top of it. I might also apply this filter again at the very end to recover clarity lost when reducing the image size for the web.

Second Approach to Midtone Contrast
I also like improve midtone contrast with High Pass filter described below, but it unfortunately has similar potential halo issues like the clarity slider.
  • Create a new Merged Layer (on a PC: ctrl+shift+alt+e )
  • Create Smart Object    (optional, if you have it)
  • Filter => Other => High Pass
  • Set Amount to 50-ish (if it's a smart filter, then you can change this later)
    • Unfortunately, this can also introduce some haloes.
    • I usually spend time trying to clean them up in subsequent layers.
  • Set Blend Mode to Overlay (or Soft Light, or play around with it)
  • Tweak the Layer Opacity to taste
  • Optional: Double click the layer to bring up the dialogue and pull in the Blend If sliders to taste
    • Use Alt to click & drag on the inner most part of the sliders to separate them (according to taste; I usually find a separation of around 30-50 works best for me)
      • This preserves the extreme highlights or shadows

Wrapping It Up
Most of my other processing techniques are in a huge state of flux right now. I've been spending an embarrassing amount of hours tinkering and experimenting. I even just bought a book about the strange and mysterious world of LAB mode - yikes, wish me luck! (And by all means, post any photo processing tips you are willing to pass along, related to midtone contrast or otherwise.) So far, through it all, this Unsharp Mask method of enhancing midtone contrast has been a quick and reliable mainstay for just about every image I process.

Hope this technique helps you too!

-by Laura A Knauth

Wednesday, May 8, 2013

Photo Series: Sea Foam Swirls

You never know what the weather will bring. After a nightlong downpour, and drizzly pre-dawn, the skies began to clear at daybreak to herald a beautiful day for photography, starting with this series of photos from Cape Kiwanda. I played around with different lenses and perspectives, and two different takes on the same location are shown below. 


Sea Foam Swirls
Copyright Laura A Knauth, All rights reserved.
Please contact me for any usage or licensing options.
Location
Cape Kiwanda near Pacific City, Oregon
 
Technical Info
Canon 50d 
Tokina 11-16mm Lens, 11mm 
f11, 6s, ISO 100 

Filters:

General Tip
For the one photo I've sold to a magazine cover (Curve of the Earth), I was very fortunate the magazine was willing to post-process the image to add more sky, extending the horizontal shot vertically, not only to fit the aspect ratio they needed, but also to add more negative space for their magazine content (Title, Article lists, ...). It was a great lesson since I hadn't thought to play around with negative space more often, and many people have a tendency to only shoot landscape shots horizontally.


Quiet Morning Waves
Copyright Laura A Knauth, All rights reserved.
Please contact me for any usage or licensing options.

The tide carried foam patches along the beach in these interesting abstract swirls.

Location
Pacific City, Oregon
Technical Info
Canon 50d 
11-16mm Lens, 16mm 
f/8, 5s, ISO 100 

Filters:

Hope these tips help!

-by Laura A Knauth

Monday, May 6, 2013

In Defense of Dandelions

Save money and pick free food already growing in your own backyard. :)  Turns out dandelions are probably one of the healthier foods you can be eating, and it's probably growing somewhere close-by wherever you are in the world. When I was a kid, I remember the frustrating chore of trying to pull up dandelions, and their tenacious roots, as they sprang up all through the mowed lawn. I had even come to associate those lovely yellow flowers as a nuisance - sigh.

Strange to realize people (including me) were conditioned to spend money on chemicals to kill the dandelions, more chemicals to cultivate expensive finicky garden plants, and then spend more money buying food from the store. … Always follow the money. I've learned a more cost effective, less time intensive, more rewarding approach to gardening: Appreciate the wild food that flourishes on it's own and likely provides more nutrients than what you would pay for in the store. :)  For some reason, when I was growing up, I had thought dandelions were toxic … the white sap from the flower stalks always scared me, but just about every part of the dandelion, from the roots, to the flowers, the stalks (including that sap), the leaves, the seeds all are attributed with different nutritional or medicinal benefits - not only for vitamins & minerals, but lymph system and digestion support.

Dandelion Tool for more easily digging up the roots ... for cooking :)
I bought mine on Amazon but it might be at your local hardware store.
So far, I've just put the leaves in my smoothies, and made tea with the roots, but that's only the top of a very long list of possibilities. Here's a YouTube video that I found helpful when I was initially learning about the benefits of dandelions.  Among other factors, the deep roots of the dandelions make them more likely to pull up minerals from lower layers of soil vs other plants whose roots stay in depleted topsoil. Dandelion mimics (like Cat's Ear) are also edible, but for salads, the smooth surface of the true dandelion leaves might make them more appealing.

I realized I have been spending so much money buying plants for the garden that I couldn't eat and took a lot of time and energy to keep alive, while trying to get rid of beneficial plants that can take care of themselves. Doh! So this year, I am experimenting with a different approach. I've deliberately planted what most farmers usually dred (because most people haven't caught on yet that it's awesome food) : dandelions, stinging nettles, shepherd's purse, lambs quarters and plantain. (...along with kale, sorrel, and other various herbs, but I've allocated the most space to the wild foods this time. Hey, they want to live; I'll support them!)

Already I love this bottom-up approach (to support what is already working) rather than a top down, frankly arrogant, authoritative, micromanaging approach that is usually encouraged in so many facets of modern life. It's not like we have more resources than we know what to do with nowadays; makes sense to me to focus on efficiency all around. The complete picture. Companies have no incentive to support wild foods. That's on us to investigate. Seems well worth testing to me! I'll post an update later in the year about how much time I spend working on the garden vs output compared to previous years.

If nothing else, now when I look out at an open field and see the dots of yellow dandelion flowers, I can't help but smile and appreciate the bountiful resources growing freely. (Although I'd be cautious about eating them from public parks or along a roadside though since spraying is so common, and pets are usually marking their territory…) Now that I'm learning more about wild foods, it's fun to walk through the park and realize there are also other edible plants growing all around: berry bushes, miner's lettuce, clover, horsetail (for tea), and on and on. Random side note: I was watching part of a zombie movie where survivors were walking through a forest stressing about where to find food … but they were surrounded by wild food, they just didn't know so much of what they were walking by was actually edible. It's like if it's not in a box or a can, it is not 'safe' to eat. Doh!

So, here's a post in defense of dandelions and other maligned weeds. I would recommend doing some research to make sure you have properly identified the plants, or maybe deliberately try planting seeds of known plants (I ordered several varieties from Seeds Of Change and Mountain Rose Herbs. Maybe it's silly, but I wanted to play it safe.) In general though, as long as the dandelions haven't been sprayed or otherwise debacled on ;p  with minimal effort, you might be able to take advantage of free food already growing in your own backyard!


by Laura A Knauth